Overview
Posting the Schedule is the last step in the scheduling process.
A Schedule is posted for the entire location for all Areas/Groups/Jobs created.
When you initially add a shift to the schedule, it is only visible to you and other supervisors and managers; the employee cannot see the shift in the Mobile Application until you post it. This allows you to build and tweak the schedule without making it visible to your employees.
When you have finished creating the schedule and post it, you need to let your employees know that they have new shifts, and can see the shifts in the Mobile App.
Posted Schedule indicators in the Desktop Application
Posted and unposted days have visual indicators in the date header to let you know their status in the Mobile Application.
-
Posted date indicator:

-
Unposted Date indicator:

To Post the Schedule for the entire Location
The schedule is posted for the entire location up to and including the date selected.
Steps:
-
Click on the + button on the top of the screen, next to the Search Box.
The Post Schedule dialog appears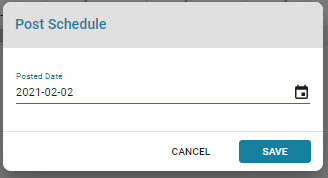
-
Enter or select the last date of the schedule you wish to post. The date selected is included in the posting.
-
Click Save. Press F5 to refresh the screen.
A yellow icon is displayed in the date header for all dates up to and including the date selected.
The Shifts are now visible in the Mobile Application
To Edit the Posted Schedule
Jobs and shifts can be edited in a Posted Schedule as needed. The changes will appear in the Mobile Application on Save.
-
To edit Jobs, see Creating and managing Jobs
-
To edit Shifts, see Creating and managing Shifts in Plan>Schedule
To ‘UnPost’ the Schedule for the entire Location
You may need to ‘unpost’ a schedule if you accidentally post it too early, or if you need to modify the shifts without making the changes immediately visible to the employee.
When you ‘unpost’ a schedule, the assigned employee can no longer see shifts after the new posting date in the Mobile Application. The shifts are still visible to supervisors, managers, and the account holder.
Steps:
-
Click on the + button on the top of the screen, next to the Search Box.
The Post Schedule dialog appears -
Enter or select the last date of the schedule that you wish to keep posted. The date selected is included in the posting.
-
Click Save. Press F5 to refresh the screen
A yellow icon is displayed in the date header for all dates up to and including the date selected.
The icons in all dates after the new posting date revert to the unposted icon, and in the mobile app, the days revert to "schedule has not been posted yet".
Comments
0 comments
Article is closed for comments.